
Just in time for the summer, we’ve released a new feature in Visual Studio Code for Education that allows teachers and curriculum providers to create and publish their own lessons and courses in VS Code for Edu. Here’s a quick tour around this new feature –
Authoring Tab
When you log into https://vscodeedu.com, you will see a new “Authoring” tab appear in the top navigation bar:

Clicking on this will open a new page which will show all the courses or lessons that you have authored. It will be blank the first time you open it, but once you create a few courses, you’ll see a list of them appear in this view.

Each course is saved in a GitHub repository, so you will need to link your GitHub account in order to create courses. If you don’t have a GitHub account, you can create a free account here: https://github.com/signup.
When you click the “Create new” button, you will be prompted to link your GitHub account. Click the Continue to GitHub button and select Authorize vscode-edu and Authorize Visual Studio Code. You may also have to allow the ‘GitHub Repositories’ extension to access your GitHub account.

Once you link your GitHub account, you can specify the Title and Description for your learning activity, select whether the course is using Python or Web (HTML/CSS/JavaScript), and select whether you want the course to be stored in a Private or Public GitHub repository. Public repositories are accessible to everyone on the internet and Private repositories are only accessible to you or people you explicitly share access with. For more about GitHub repositories, see About repositories.

User Interface
Once you click on Create activity, you will be taken to the content editing experience:
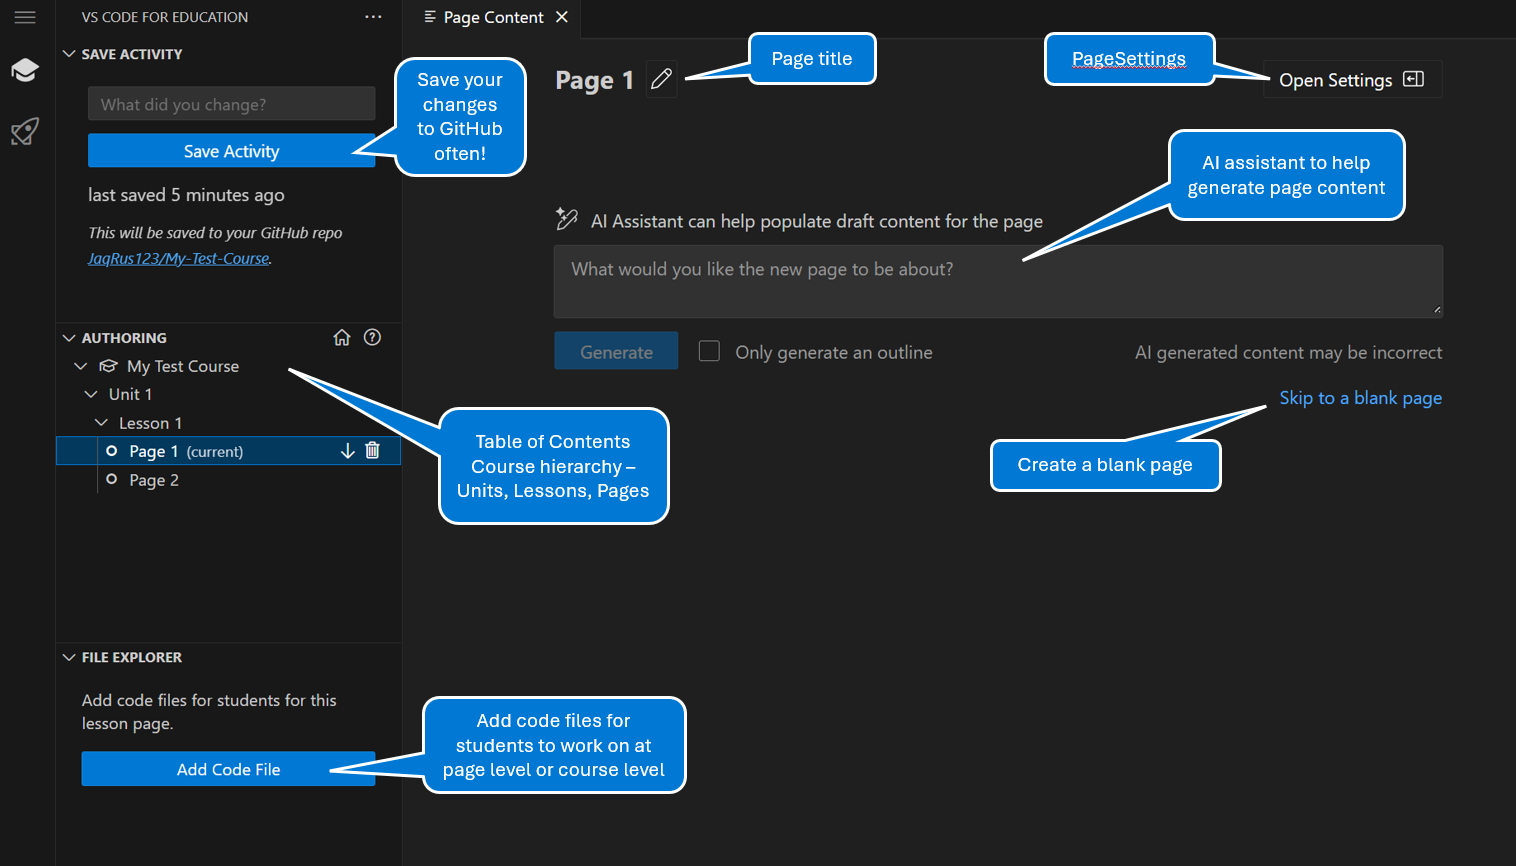
In the left pane, you will find the following areas:
-
Save Activity – your content will be saved in a GitHub repo, and you can optionally add some text describing your changes. We recommend saving your progress often so you don’t lose work!
-
Authoring – the Table of Contents, or the outline for your course is displayed in the Authoring pane. The course hierarchy is structured based on Units, Lessons and Pages. Click on the plus (+) icon to create new items in your course, re-order items using the up or down arrow icons, and delete items from the course with the trash icon.
-
File Explorer – in this window you will be able to add and see any code files associated with the full course or with a specific lesson page. You can create code files for the whole course (Global) or create files just for the specific page. Clicking on the Add Code File button or Add Global File icon will bring you to the Command Palette at the top of the screen where you will be prompted to give your file a name.


Settings
If you click on the Course, Unit or Lesson folders in the Authoring window, you will see the Settings fields for each section of your course. The Course settings fields will display information on the front page of your course.

On the Lesson settings page, you can select CSTA standards to align your lesson with.

Content Editing
When editing a lesson page, there are several features you can take advantage of:

-
Formatting Toolbar – includes text formatting tools, the ability to insert quotes, horizontal lines, code blocks, images and lists
-
Markdown Toggle – for more advanced editing capabilities, you can create your content in Markdown syntax directly.
-
Questions – at the bottom of each page is the option to add formative assessment questions for students. The types of questions that can be added are:
- String – response is an open text field
- Single Choice – multiple choice question with a single correct answer
- Multiple Choice – multiple choice question with multiple correct answers
- Reflection – open journaling style answer, no correct answer


AI Assistance
In both the Formatting Toolbar and in the Questions section, there are AI Assistant capabilities to help with creating content and adding questions.
The AI Assistant can help you:
- rewrite selected text, code, or the whole page
- insert a paragraph, a code example, or a summary from an external source
- re-level the content for specific reading levels
- expand or shorten the length of content


For generating questions, the AI Assistant can create new questions based on the content of the page and any other instructions you give.


Visual Studio Code for Education complies with Microsoft’s Responsible AI policies and protects user data privacy. For more information about the use of AI in VS Code for Education, please see the FAQ page.
Publishing
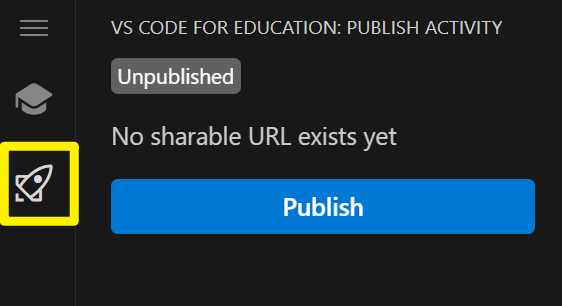
To see the student view of a course, click on the rocket ship icon in the Activity bar on the left. This will open the Publishing pane where you can click the Publish button. This will create a link to your course which you can share with your students, or open to see the student view of your course.
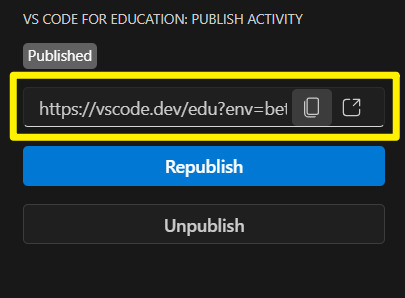
You can also republish your course if you’ve made any updates or changes. This will generate a new link to your course. And you can also unpublish your course to remove access.
When testing your published course to see the student view, your progress in that course will be saved when you edit files and answer questions. To reset this progress, go to My Work | My courses, find the course that you are working on, click the 3-dot menu and select “Unenroll”. This will clear your progress as a student in the course.

Feedback
We hope this feature is helpful for teachers to create their own lessons and course materials in VS Code for Education! So while school is out, and in between trips to the beach, we encourage you to play around creating your own lesson in Visual Studio Code for Education. We would love to hear your thoughts on the experience, please post your feedback on the VS Code Edu Community Forum and share what you’ve created!
− The Visual Studio Code for Education Team